5. Fluid Elements
Section author: jryannel
Note
Last Build: May 12, 2015 at 15:52 CET
The source code for this chapter can be found in the assets folder.
Till now, we have mostly looked at simple graphical elements and how to arrange and manipulate them. This chapter is about how to control these changes in a way that a value of a property not just changes instantly, it’s more how the value changes over time: an animation. This technology is one of the key foundations for modern slick user interfaces and can be extended with a system to describe your user interface using states and transitions. Each state defines a set of property changes and can be combined with animations on state changes, called transitions.
5.1. Animations
Animations are applied to property changes. An animation defines the interpolation curve when for property value changes to create smooth transitions from one value to another. An animation is defined by a series of target properties to be animated, an easing curve for the interpolation curve and in the most cases a duration, which defines the time for the property change. All animations in QtQuick are controlled by the same timer, and are therefore synchronized. This improves the performance and visual quality of animations.
Note
Animations control how property changes, i.e. value interpolation. This is a fundamental concept. QML is based on elements, properties and scripting. Every element provides dozens of properties, each property is waiting to get animated by you. During the book you will see this is a spectacular playing field. You will caught yourself at looking at some animations and just admire their beauty and for sure also your creative genius. Please remember then: Animations control property changes and every element has dozens of properties at your disposal.
Unlock the power!
// animation.qml

import QtQuick 2.0

Image {
    source: "assets/background.png"

    Image {
        x: 40; y: 80
        source: "assets/rocket.png"

        NumberAnimation on x {
            to: 240
            duration: 4000
            loops: Animation.Infinite
        }
        RotationAnimation on rotation {
            to: 360
            duration: 4000
            loops: Animation.Infinite
        }
    }
}
The example above shows a simple animation applied on the x and rotation property. Each animation has a duration of 4000 milliseconds (msecs) and loops forever. The animation on x moves the x coordinate from the rocket gradually over to 240px. The animation on rotation runs from the current angle to 360 degree. Both animations run in parallel and are started as soon as the UI is loaded.
Now you can play around with the animation by changing the to and duration property or you could add another animation for example on the opacity or even the scale. Combining these it could look like the rocket is disappearing in the endless deep space. Try it out!
5.1.1. Animation Elements
There are several types of animation elements, each optimized for a specific use case. Here is a list of the most prominent animations:
PropertyAnimation- Animates changes in property valuesNumberAnimation- Animates changes in qreal-type valuesColorAnimation- Animates changes in color valuesRotationAnimation- Animates changes in rotation values
Besides these basic and widely used animation elements, QtQuick provides also more specialized animations for specific use cases:
PauseAnimation- Provides a pause for an animationSequentialAnimation- Allows animations to be run sequentiallyParallelAnimation- Allows animations to be run in parallelAnchorAnimation- Animates changes in anchor valuesParentAnimation- Animates changes in parent valuesSmoothedAnimation- Allows a property to smoothly track a valueSpringAnimation- Allows a property to track a value in a spring-like motionPathAnimation- Animates an item along a pathVector3dAnimation- Animates changes in QVector3d values
We will learn later how to create a sequence of animations. While working on more complex animations there comes up the need to change a property or to run a script during an an ongoing animation. For this QtQuick offers the action elements, which can be used everywhere where the other animation elements can be used:
PropertyAction- Specifies immediate property changes during animationScriptAction- Defines scripts to be run during an animation
The major animation types will be discussed during this chapter using small focused examples.
5.1.2. Applying Animations
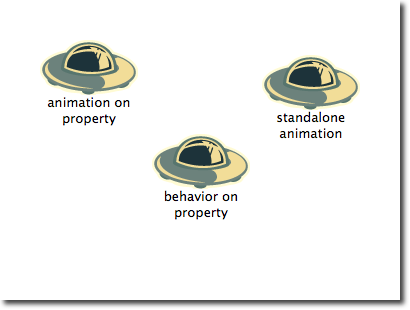
Animation can be applied in several ways:
- Animation on property - runs automatically after element is fully loaded
- Behavior on property - runs automatically when the property value changes
- Standalone Animation - runs when animation is explicitly started using
start()orrunningis set to true (e.g. by a property binding)
Later we see also how animations can be used inside state transitions.
Extended ClickableImage Version 2
To demonstrate the usage of animations we reuse our ClickableImage component from an earlier chapter and extended it with a text element.
// ClickableImageV2.qml
// Simple image which can be clicked

import QtQuick 2.0

Item {
    id: root
    width: container.childrenRect.width
    height: container.childrenRect.height
    property alias text: label.text
    property alias source: image.source
    signal clicked

    Column {
        id: container
        Image {
            id: image
        }
        Text {
            id: label
            width: image.width
            horizontalAlignment: Text.AlignHCenter
            wrapMode: Text.WordWrap
            color: "#111111"
        }
    }

    MouseArea {
        anchors.fill: parent
        onClicked: root.clicked()
    }
}
To organize the element below the image we used a Column positioner and calculated the width and height based on the column’s childrenRect property. We exposed two properties: text and the image source as also the clicked signal. We also wanted that the text is as wide as the image and it should wrap. We achieve the latter by using the Text elements wrapMode property.
Note
Due to the inversion of the geometry-dependency (parent geometry depends on child geometry) we can’t set a width/height on the ClickableImageV2, as this will break our width/height binding. This is a limitation on our internal design and as a designer of components you should be aware of this. Normally you should prefer the child’s geometry to depend on the parent’s geometry.
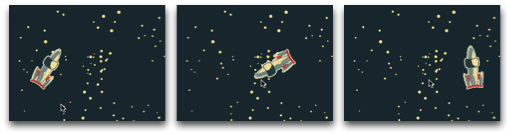
The rocket race can start.

The three rockets are all at the same y-position (y=200). They need to travel all to y=40. Each of them using a different method with different side-effects and features.
    ClickableImageV3 {
        id: rocket1
        x: 40; y: root.height-height
        source: "assets/rocket.png"
        text: "animation on property"
        NumberAnimation on y {
            to: 40; duration: 4000
        }
    }
1st rocket
The 1st rocket travels using the Animation on <property> strategy. The animation starts immediately. When a rocket is clicked their y-position is reset to the start position, this applies to all rockets. On the 1st rocket the reset does not have any effect as long as the animation is running. It’s even disturbing as the y-position is set for a fraction of a second to a new value before the animation starts. Such competing property changes should be avoided.
    ClickableImageV3 {
        id: rocket2
        x: 152; y: root.height-height
        source: "assets/rocket.png"
        text: "behavior on property"
        Behavior on y {
            NumberAnimation { duration: 4000 }
        }

        onClicked: y = 40
        // random y on each click
//        onClicked: y = 40+Math.random()*(205-40)
    }
2nd rocket
The 2nd rocket travels using a behavior on animation. This behavior tells the property, every time the property value changes, it changes through this animation. The behavior can be disabled by enabled : false on the Behavior element. The rocket will start traveling when you click it (y-position is then set to 40). Another click has no influence as the position is already set. You could try to use a random value (e.g. 40+(Math.random()*(205-40)) for the y-position. You will see that the rocket will always animate to the new position and adapt is speed to match the 4 seconds to the destination defined by the animations duration.
    ClickableImageV3 {
        id: rocket3
        x: 264; y: root.height-height
        source: "assets/rocket.png"
        onClicked: anim.start()
//        onClicked: anim.restart()

        text: "standalone animation"

        NumberAnimation {
            id: anim
            target: rocket3
            properties: "y"
            to: 40
            duration: 4000
        }
    }
3rd rocket
The 3rd rocket uses a standalone animation. The animation is defined as an own element and could be everywhere in the document. The click will start the animation using the animations function start(). Each animation has a start(), stop(), resume(), restart() function. The animation itself contains much more information then the other animation types earlier. We need to define the target and properties to declare the target element to be animated and which properties we want to animate. We need to define a to value and in this case we define also a from value to allow a re-start of the animation.
A click on the background will reset all rockets to their initial position. The 1st rocket can’t be restarted only be re-starting the program which triggers the re-loading of the element.
Note
Another way to start/stop an animation is to bind a property to the running property of an animation. This is especially useful when the user-input is in control of properties:
NumberAnimation {
    ...
    // animation runs when mouse is pressed
    running: area.pressed
}
MouseArea {
    id: area
}
5.1.3. Easing Curves
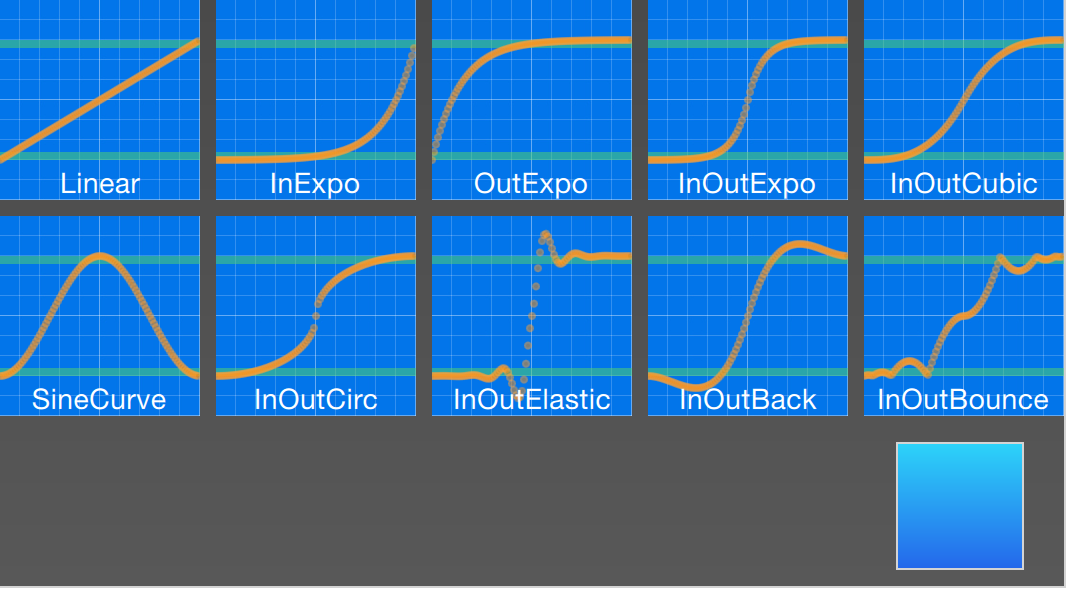
The value change of a property can be controlled by an animation. Easing attributes allows to influence the interpolation curve of a property change. All animations we have defined by now use a linear interpolation because the initial easing type of an animation is Easing.Linear. It’s best visualized with a small plot, where the y-axis is the property to be animated and the x-axis is the time (duration). A linear interpolation would draw a straight line from the from value at the start of the animation to the to value at the end of the animation. So the easing type defines the curve of change. Easing types are carefully chosen to support a natural fit for a moving object, for example when a page slides out. Initially the page should slide out slowly and then gaining the speed to finally slide out on high speed, similar to turning a book side.
Note
Animations should not be overused. As other aspects of UI design also animations should be designed carefully and support the UI flow and not dominate it. The eye reacts very sensible on moving objects and can easily distract the user.
In the next example we will try some easing curves. Each easing curve is displayed by a click-able image and when clicked will set a new easing type on the square animation as also trigger a restart() to run the animation with the new curve.
Extended ClickableImage V3
We enhanced the ClickableImage for another time be able to add a small frame around the image and text. For that we added a property bool framed: false property to our API and based on framed value we set the visibility of the frame to not break existing element users. Here are the changes we did.
// ClickableImageV2.qml
// Simple image which can be clicked

import QtQuick 2.0

Item {
    id: root
    width: container.childrenRect.width + 16
    height: container.childrenRect.height + 16
    property alias text: label.text
    property alias source: image.source
    signal clicked

    // M1>>
    // ... add a framed rectangle as container
    property bool framed : false

    Rectangle {
        anchors.fill: parent
        color: "white"
        visible: root.framed
    }
The code for this example was made compact. We use an array of easing curve names (property variant easings) and assign them inside a Repeater element to a ClickableImage. The image source is defined through a naming scheme, so an easing curve named “InQuad” will have a respective diagram under the location “curves/InQuad.png”. If you click one curve diagram the click handler will assign the easing type to the animation and then restart the animation. The animation itself is a standalone-animation with the target set to the square and configured for x-property animation with a duration of 2 secs.
// easingtypes.qml

import QtQuick 2.0

DarkSquare {
    id: root
    width: 600
    height: 340

    // A list of easing types
    property variant easings : [
        "Linear", "InQuad", "OutQuad", "InOutQuad",
        "InCubic", "InSine", "InCirc", "InElastic",
        "InBack", "InBounce" ]


    Grid {
        id: container
        anchors.top: parent.top
        anchors.horizontalCenter: parent.horizontalCenter
        anchors.margins: 16
        height: 200
        columns: 5
        spacing: 16
        // iterates over the 'easings' list
        Repeater {
            model: easings
            ClickableImageV3 {
                framed: true
                // the current data entry from 'easings' list
                text: modelData
                source: "curves/" + modelData + ".png"
                onClicked: {
                    // set the easing type on the animation
                    anim.easing.type = modelData
                    // restart the animation
                    anim.restart()
                }
            }
        }
    }

    // The square to be animated
    GreenSquare {
        id: square
        x: 40; y: 260
    }

    // The animation to test the easing types
    NumberAnimation {
        id: anim
        target: square
        from: 40; to: root.width - 40 - square.width
        properties: "x"
        duration: 2000
    }
}
When you run it and play with it, please observe the change of speed during an animation. Some animations feel more natural for the object and some feel irritating.
Besides the duration and easing.type you are able to fine tune animations. For example the general PropertyAnimation where most animation inherit from supports additionally an easing.amplitude, easing.overshoot and easing.period property which allows you to fine-tune the behavior of particular easing curve. Not all easing curves support these parameters. Please consult the easing table from the PropertyAnimation documentation to check if an easing parameter has influence on an easing curve.
Note
Choosing the right animation for the element in the user interface context is crucial for the outcome. Remember the animation shall support the UI flow not irritate the user.
5.1.4. Grouped Animations
Often animations will be more complex then just animating one property. It might be you want to run several animation combined at the same time or one-after another or even execute a script between two animations. For this the grouped animation offer you a possibility. As the named suggests it’s possible to group animation. Grouping can be in two ways: parallel or sequential. For this you can use the SequentialAnimation or the ParallelAnimation element, which act as an animation containers for other animation elements. These grouped animations are animations themselves and can be used exactly as such.
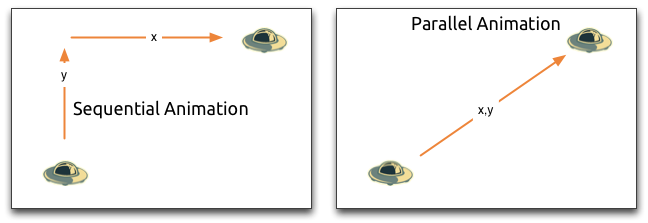
All direct child animations of a parallel animation will run in parallel, when started. This allows you to animate different properties at the same time.
// parallelanimation.qml
import QtQuick 2.0
BrightSquare {
id: root
width: 600
height: 400
property int duration: 3000
property Item ufo: ufo
Image {
anchors.fill: parent
source: "assets/ufo_background.png"
}
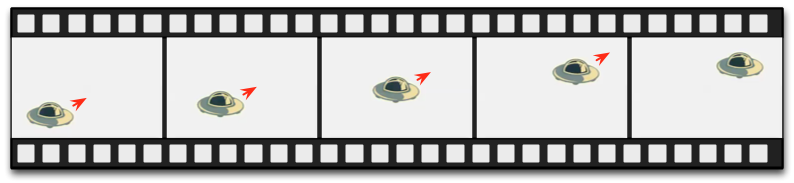
ClickableImageV3 {
id: ufo
x: 20; y: root.height-height
text: 'rocket'
source: "assets/ufo.png"
onClicked: anim.restart()
}
ParallelAnimation {
id: anim
NumberAnimation {
target: ufo
properties: "y"
to: 20
duration: root.duration
}
NumberAnimation {
target: ufo
properties: "x"
to: 160
duration: root.duration
}
}
}
A sequential animation will first run the first child animation and then continue from there.
// sequentialanimation.qml
import QtQuick 2.0

BrightSquare {
    id: root
    width: 600
    height: 400
    property int duration: 3000

    property Item ufo: ufo

    Image {
        anchors.fill: parent
        source: "assets/ufo_background.png"
    }

    ClickableImageV3 {
        id: ufo
        x: 20; y: root.height-height
        text: 'rocket'
        source: "assets/ufo.png"
        onClicked: anim.restart()
    }

    SequentialAnimation {
        id: anim
        NumberAnimation {
            target: ufo
            properties: "y"
            to: 20
            // 60% of time to travel up
            duration: root.duration*0.6
        }
        NumberAnimation {
            target: ufo
            properties: "x"
            to: 400
            // 40% of time to travel sideways
            duration: root.duration*0.4
        }
    }
}
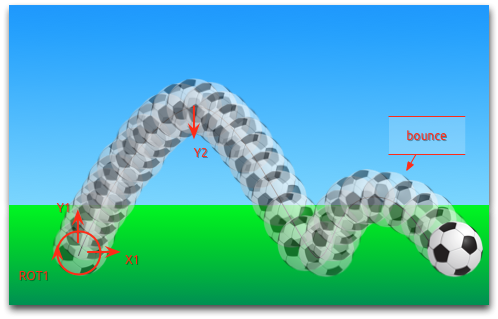
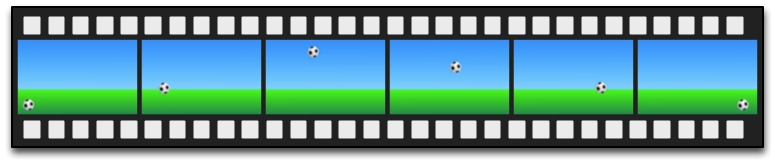
Grouped animation can also be nested, for example a sequential animation can have two parallel animations as child animations, and so on. We can visualize this with a soccer ball example. The idea is to throw a ball from left to right an animate its behavior.

To understand the animation we need to dissect it into the integral transformations of the object. We need to remember animation do animate property changes. Here are the different transformations:
- An x-translation from left-to-right (
X1) - An y-translation from down to up (
Y1) followed by a translation from up to down (Y2) with some bouncing - A rotation over 360 over the whole animation duration (
ROT1)
The whole duration of the animation should take three seconds.
We start with an empty item as root element of the width of 480 and height of 300.
import QtQuick 1.1

Item {
    id: root
    width: 480
    height: 300
    property int duration: 3000

    ...
}
We have defined our total animation duration as reference to better synchronize the animation parts.
The next step would be to add the background, which in our case are 2 rectangles with a green and blue gradients.
    Rectangle {
        id: sky
        width: parent.width
        height: 200
        gradient: Gradient {
            GradientStop { position: 0.0; color: "#0080FF" }
            GradientStop { position: 1.0; color: "#66CCFF" }
        }
    }
    Rectangle {
        id: ground
        anchors.top: sky.bottom
        anchors.bottom: root.bottom
        width: parent.width
        gradient: Gradient {
            GradientStop { position: 0.0; color: "#00FF00" }
            GradientStop { position: 1.0; color: "#00803F" }
        }
    }
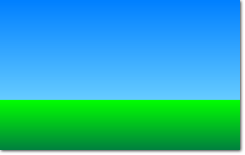
The upper blue rectangle takes 200 pixel of the height and the lower one is anchored to the top on the sky and to the bottom on the root element.
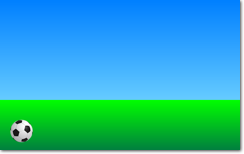
Let’s bring the soccer ball onto the green. The ball is an image, stored under “assets/soccer_ball.png”. For the beginning we would like to position it in the lower left corner, near the edge.
    Image {
        id: ball
        x: 0; y: root.height-height
        source: "assets/soccer_ball.png"

        MouseArea {
            anchors.fill: parent
            onClicked: {
                ball.x = 0;
                ball.y = root.height-ball.height;
                ball.rotation = 0;
                anim.restart()
            }
        }
    }
The image has a mouse area attached to it. If the ball is clicked the position of the ball will reset and the animation restarted.
Let’s start with an sequential animation for the two y translation first.
SequentialAnimation {
    id: anim
    NumberAnimation {
        target: ball
        properties: "y"
        to: 20
        duration: root.duration * 0.4
    }
    NumberAnimation {
        target: ball
        properties: "y"
        to: 240
        duration: root.duration * 0.6
    }
}

This gives during 40% of the total animation duration the up animation and for 60% the down animation. One animation after another as a sequence. The transformations are animated on a linear path but there is no curve currently. Curves will be added later using the easing curves, at the moment we concentrate on getting the transformations animated.
Now we need to add the x-translation. The x-translation shall run in parallel with the y-translation so we need to encapsulate the sequence of y-translations into a parallel animation together with the x-translation.
ParallelAnimation {
    id: anim
    SequentialAnimation {
        // ... our Y1, Y2 animation
    }
    NumberAnimation { // X1 animation
        target: ball
        properties: "x"
        to: 400
        duration: root.duration
    }
}
At the end we would like the ball to be rotating. For this we need to add another animation to the parallel animation. We choose the RotationAnimation as it’s specialized for rotation.
ParallelAnimation {
    id: anim
    SequentialAnimation {
        // ... our Y1, Y2 animation
    }
    NumberAnimation { // X1 animation
        // X1 animation
    }
    RotationAnimation {
        target: ball
        properties: "rotation"
        to: 720
        duration: root.duration
    }
}
That’s the whole animation sequence. The one thing left is to provide the correct easing curves for the movements of the ball. For the Y1 animation I use a Easing.OutCirc curve as this shall look more like a circular movement. Y2 is enhanced using a Easing.OutBounce as the ball shall bounce and the bouncing shall happening at the end (try an Easing.InBounce and you see the bouncing will start right away).
The X1 and ROT1 animation are left as is with a linear curve.
Here is the final animation code for your reference:
    ParallelAnimation {
        id: anim
        SequentialAnimation {
            NumberAnimation {
                target: ball
                properties: "y"
                to: 20
                duration: root.duration * 0.4
                easing.type: Easing.OutCirc
            }
            NumberAnimation {
                target: ball
                properties: "y"
                to: root.height-ball.height
                duration: root.duration * 0.6
                easing.type: Easing.OutBounce
            }
        }
        NumberAnimation {
            target: ball
            properties: "x"
            to: root.width-ball.width
            duration: root.duration
        }
        RotationAnimation {
            target: ball
            properties: "rotation"
            to: 720
            duration: root.duration
        }
    }
5.2. States and Transitions
Often parts of a user interface can be described in states. A state defines a set of property changes and can be triggered by a certain condition. Additional these state switches can have a transition attached which defines how these changes should be animated or any additional actions shall be applied. Actions can also be applied when a state is entered.
5.2.1. States
You define states in QML with the State element, which needs to be bound to the states array of any item element. A state is identified through a state name and consist in its simplest form of a series of property changes elements. The default state is defined by the initial properties of the element and is named "" (the empty string).
Item {
    id: root
    states: [
        State {
            name: "go"
            PropertyChanges { ... }
        },
        State {
            name: "stop"
            PropertyChanges { ... }
        }
    ]
}
A state is changed by assigning a new state name to the state property of the element with the states defined.
Note
Another way to switch states is using the when property of the State element. The when property can be set to an expression that evaluates to true when the state should be applied.
Item {
    id: root
    states: [
        ...
    ]

    Button {
        id: goButton
        ...
        onClicked: root.state = "go"
    }
}
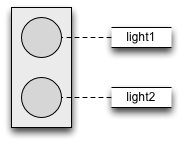
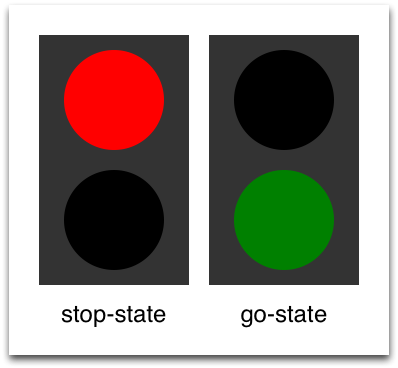
For example a traffic light might have two signaling lights. The upper one signaling stop with a red color and the lower one signaling go with a green color. In this example both lights should not shine at the same time. Let’s have a look at the state chart diagram.
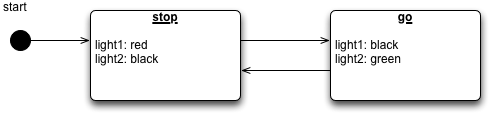
When the system is switched on it goes automatically into the stop mode as default state. The stop state changes the light1 to red and light2 to black (off). An external event can trigger now a state switch to the "go" state. In the go state we change the color properties from light1 to black (off) and light2 to green to indicate the passers may walk now.
To realize this scenario we start sketching our user interface for the 2 lights. For simplicity we use 2 rectangles with the radius set to the half of the width (and the width is the same as the height, which means it’s a square).
    Rectangle {
        id: light1
        x: 25; y: 15
        width: 100; height: width
        radius: width/2
        color: root.black
        border.color: Qt.lighter(color, 1.1)
    }

    Rectangle {
        id: light2
        x: 25; y: 135
        width: 100; height: width
        radius: width/2
        color: root.black
        border.color: Qt.lighter(color, 1.1)
    }
As defined in the state chart we want to have two states one the "go" state and the other the "stop" state, where each of them changes the traffic lights respective to red or green. We set the state property to stop to ensure the initial state of our traffic light is the stop state.
Note
We could have achieved the same effect with only a "go" state and no explicit "stop" state by setting the color of light1 to red and the color of light2 to black. The initial state "" defined by the initial property values would then act as the "stop" state.
    state: "stop"

    states: [
        State {
            name: "stop"
            PropertyChanges { target: light1; color: root.red }
            PropertyChanges { target: light2; color: root.black }
        },
        State {
            name: "go"
            PropertyChanges { target: light1; color: root.black }
            PropertyChanges { target: light2; color: root.green }
        }
    ]
Using PropertyChanges { target: light2; color: "black" } is not really required in this examples as the initial color of light2 is already black. In a state it’s only necessary to describe how the properties shall change from their default state (and not from the previous state).
A state change is triggered using a mouse area which covers the whole traffic light and toggles between the go and stop state when clicked.
    MouseArea {
        anchors.fill: parent
        onClicked: parent.state = (parent.state == "stop"? "go" : "stop")
    }
We are now able to successfully change the state of the traffic lamp. To make the UI more appealing and look natural we should add some transitions with animation effects. A transition can be triggered by a state change.
Note
It’s possible to create a similar logic using scripting instead of QML states. Developers can easily fall into the trap of writing more a JavaScript program than a QML program.
5.2.2. Transitions
A series of transitions can be added to every item. A transition is executed by a state change. You can define on which state change a particular transition can be applied using the from: and to: properties. These two properties act like a filter, when the filter is true the transition will be applied. You can also use the wild-cast “*” which means “any state”. For example from:”*”; to:”*” means from any state to any other state and is the default value for from and to, which means the transition is applied to every state switch.
For this example we would like to animate the color changes when switching state from “go” to “stop”. For the other reversed state change (“stop” to “go”) we want to keep an immediate color change and don’t apply a transition. We restrict the transition with the from and to properties to filter only the state change from “go” to “stop”. Insite the transition we add two color animations for each light, which shall animate the property changes defined in the state description.
    transitions: [
        Transition {
            from: "stop"; to: "go"
//            from: "*"; to: "*"
            ColorAnimation { target: light1; properties: "color"; duration: 2000 }
            ColorAnimation { target: light2; properties: "color"; duration: 2000 }
        }
    ]
You can change the state though clicking the UI. The state is applied immediately and will also change the state while a transition is running. So try to click the UI while the state is in transition from “stop” to “go”. You will see the change will happen immediately.
You could play around with this UI for example by scaling the inactive light down to highlight the active light. For this you would need to add another property change for scaling to the states and also handle the animation for the scaling property in the transition. Another option would be to add a “attention” state where the lights are blinking yellow. For this you would need to add a sequential animation to the transition for one second going to yellow (“to” property of the animation and one sec going to “black”). Maybe you also want to change the easing curve to make it more appealing.