1. Meet Qt 5
Section author: jryannel
Note
The source code of this chapter can be found in the assets folder.
This book shall provide you a walk through the different aspect of application development using Qt version 5.x. It focuses on the new Qt Quick technology but also provides necessary information of writing C++ back-ends and extension for Qt Quick.
This chapter provides an high level overview of Qt 5. It shows the different application models available for developers and a Qt 5 showcase application to get a sneak preview of things to come. Additionally the chapter aims to provide a wide overview of the Qt 5 content and how to get in touch with the makers of Qt 5.
1.1. Preface
History
Qt 4 has evolved since 2005 and provided a solid ground for thousands of applications and even full desktop and mobile systems. The usage patterns computer users changed in the recent years. From stationary PCs towards portable notebook and nowadays mobile computers. The classical desktop is more and more replaced with mobile touch-based always connected screens. With it the desktop UX paradigms also changes. Where as in the past Windows UI has dominated the world we spend more time nowadays on other screens with another UI language.
Qt 4 was designed to satisfy the desktop world to have a coherent set of UI widgets available on all major platforms. The challenge for Qt users has changed today and it lies more to provide a touch-based user interface for a customer driven user interface and to enable modern user interface on all major desktop and mobile systems. Qt 4.7 started to introduce the QtQuick technology which allows users to create a set of user interface components from simple elements to achieve a complete new UI, driven by customer demands.
1.1.1. Qt5 Focus
Qt 5 is a complete refreshment of the very successful Qt 4 release. With Qt 4.8, the Qt 4 release is almost 7 years old. It’s time to make an amazing toolkit even more amazing. Qt 5 is focused on the the following:
- Outstanding Graphics: Qt Quick 2 is based on OpenGL (ES) using a scene graph implementation. The recomposed graphics stack allows a new level of graphic effects combined with an ease of use never seen before in this field.
- Developer Productivity: QML and JavaScript are the primary means for UI creation. The back-end will be driven by C++. The split between JavaScript and C++ allows a fast iteration for front-end developers concentrating on creating beautiful user interfaces and back-end C++ developers concentrating on stability, performance and extending the runtime.
- Cross-platform portability: With the consolidated Qt Platform Abstraction, it is now possible to port Qt to a wider range of platforms easier and faster. Qt 5 is structured around the concept of Qt Essentials and Add-ons, which allows OS developer to focus on the essentials modules and leads to a smaller runtime altogether.
- Open Development: Qt is now a truly open-governance project hosted at Qt-Project. The development is open and community driven.
1.2. Qt5 Introduction
1.2.1. Qt Quick
Qt Quick is the umbrella term for the user interface technology used in Qt5. Qt Quick itself is a collection of several technologies:
- QML - Markup language for user interfaces
- JavaScript - The dynamic scripting language
- Qt C++ - The highly portable enhanced c++ library
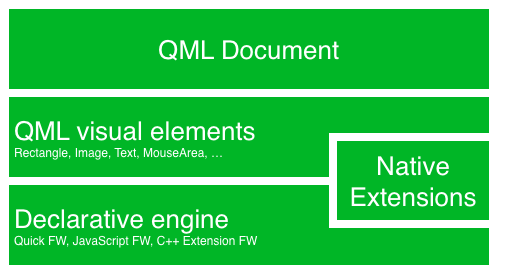
Similar to HTML, QML is a markup language. It is composed of tags called elements in QtQuick enclosed in curly brackets Item {}. It was designed from the ground up for the creation of user interfaces, speed and easier reading for developers. The user interface can be enhanced using JavaScript code. Qt Quick is easily extend able with your own native functionality using Qt C++. In short the declarative UI is called the front-end and the native parts are called the back-end. This allows you to separate the computing intensive and native operation of your application from the user interface part.
In a typical project the front-end is developed in QML/JavaScript and the back-end code, which interfaces with the system and does the heavy lifting is developed using Qt C++. This allows a natural split between the more design oriented developers and the functional developers. Typically the back-end is tested using Qt own unit testing framework and exported for the front-end developers to be used.
1.2.2. Digesting an User Interface
Let’s create a simple user interface using QtQuick, which showcases some aspects of the QML language. At the end we will have a paper windmill with rotating blades.

We start with an empty document called main.qml. All QML files will have the ending .qml. As a markup language (like HTML) a QML document needs to have one and only one root element, which in our case is the Image element with a width and height based on the background image geometry:
import QtQuick 2.3

Image {
    id: root
    source: "images/background.png"
}
As QML does not make any restriction which element type is the root element we use an Image element with the source property set to our background image as the root element.

Note
Each element has properties, e.g. a image has a width, height but also other properties like a source property. The size of the image element is automatically deducted from the image size. Otherwise we would need to set the width and height property to some useful pixel values.
The most standard elements are located in the QtQuick module which we include in the first line with the import statement.
The id special property is optional and contains an identifier to reference this element later in other places in the document. Important: An id property cannot be changed after it has been set and it cannot be set during runtime. Using root as the id for the root-element is just a habit by the author and makes referencing the top-most element predictable in larger QML documents.
The foreground elements pole and pin wheel of our user interface are placed as separate images.


The pole needs to be placed in the horizontal center of the background towards the bottom. And the pinwheel can be placed in the center of the background.
Normally your user interface will be composed of many different element types and not only image elements like in this example.
Image {
    id: root
    ...
    Image {
        id: pole
        anchors.horizontalCenter: parent.horizontalCenter
        anchors.bottom: parent.bottom
        source: "images/pole.png"
    }

    Image {
        id: wheel
        anchors.centerIn: parent
        source: "images/pinwheel.png"
    }
    ...
}
To place the pin wheel at the central location we use a complex property called anchor. Anchoring allows you to specify geometric relations between parent and sibling objects. E.g. Place me in the center of another element ( anchors.centerIn: parent ). There are left, right, top, bottom, centerIn, fill, verticalCenter and horizontalCenter relations on both ends. Sure they need to match, it does not make sense to anchor my left side to the top side of an element.
So we set the pinwheel to be centered in the parent our background.
Note
Sometime you will need to make small adjustments on the exact centering. This would be possible with anchors.horizontalCenterOffset or with anchors.verticalCenterOffset. Similar adjustments properties are also available to all the other anchors. Please consult the documentation for a full list of anchors properties.
Note
Placing an image as a child element of our root rectangle element shows an important concept of a declarative language. You describe the user interface in the order of layers and grouping, where the topmost layer (our rectangle) is drawn first and the child layers are drawn on top of it in the local coordinate system of the containing element.
To make the showcase a little bit more interesting, we would like to make the scene interactive. The idea is to rotate the wheel when the user pressed the mouse somewhere in the scene.
We use the MouseArea element and make it as big as our root element.
Image {
    id: root
    ...
    MouseArea {
        anchors.fill: parent
        onClicked: wheel.rotation += 90
    }
    ...
}
The mouse area emit signals when a user clicks inside it covered area. You can hook onto this signal overriding the onClicked function. In this case the reference the wheel image and change its rotation by +90 degree.
Note
This works for every signal, the naming is on + SignalName in title cases. Also all properties emit a signal when their value changed. The naming is:
on+PropertyName+Changed
If a width property is changing you can observe it with onWidthChanged: print(width) for example.
Now the wheel will rotate, but it is still not fluent yet. The rotation property changes immediately. What we would like that the property changes by 90 degree over time. Now animations come into play. An animation defines how a property change is distributed over a duration. To enable this we use an animation type called property behavior. The Behaviour does specify an animation for a defined property for every change applied to that property. In short every time the property changes, the animation is run. This is only one of several ways of declaring an animation in QML.
Image {
    id: root
    Image {
        id: wheel
        Behavior on rotation {
            NumberAnimation {
                duration: 250
            }
        }
    }
}
Now whenever the property rotation of the wheel changes it will be animated using a NumberAnimation with a duration of 250 ms. So each 90 degree turn will take 250 ms.

Note
You will not actually see the wheel blurred. This is just to indicate the rotation. But a blurred wheel is in the assets folder. Maybe you want to try to use that.
Now the wheel looks already much better. I hope this has given you a short idea of how Qt Quick programming works.
1.3. Qt Building Blocks
Qt 5 consists of a large amount of modules. A module in general is a library for the developer to use. Some modules are mandatory for a Qt enabled platform. They form a set called Qt Essentials Modules. Many modules are optional and form the Qt Add-On Modules. It’s expected that the majority of developers will not have the need to use them, but it’s good to know them as they provide invaluable solutions to common challenges.
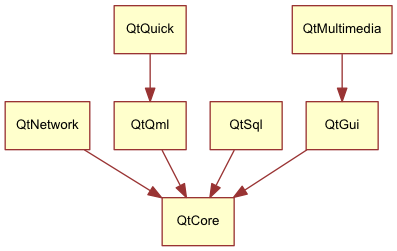
1.3.1. Qt Modules
The Qt Essentials modules are mandatory for a Qt enabled platform. They offer the foundation to develop a modern Qt 5 Application using Qt Quick 2.
Core-Essential Modules
The minimal set of Qt 5 modules to start QML programming.
| Module | Description |
|---|---|
| Qt Core | Core non-graphical classes used by other modules |
| Qt GUI | Base classes for graphical user interface (GUI) components. Includes OpenGL. |
| Qt Multimedia | Classes for audio, video, radio and camera functionality. |
| Qt Network | Classes to make network programming easier and more portable. |
| Qt QML | Classes for QML and JavaScript languages. |
| Qt Quick | declarative framework for building highly dynamic applications with custom user interfaces. |
| Qt SQL | Classes for database integration using SQL. |
| Qt Test | Classes for unit testing Qt applications and libraries. |
| Qt WebKit | Classes for a WebKit2 based implementation and a new QML API. See also Qt WebKit Widgets in the add-on modules. |
| Qt WebKit Widgets | WebKit1 and QWidget-based classes from Qt 4. |
| Qt Widgets | Classes to extend Qt GUI with C++ widgets. |
Qt Addon Modules
Besides the essential modules, Qt offers additional modules for software developers, which are not part of the release. Here is a short list of add-on modules available.
- Qt 3D - A set of APIs to make 3D graphics programming easy and declarative.
- Qt Bluetooth - C++ and QML APIs for platforms using Bluetooth wireless technology.
- Qt Contacts - C++ and QML APIs for accessing addressbooks / contact databases
- Qt Location - Provides location positioning, mapping, navigation and place search via QML and C++ interfaces. NMEA backend for positioning
- Qt Organizer - C++ and QML APIs for accessing organizer events (todos, events, etc.)
- Qt Publish and Subscribe
- Qt Sensors - Access to sensors via QML and C++ interfaces.
- Qt Service Framework - Enables applications to read, navigate and subscribe to change notifications.
- Qt System Info - Discover system related information and capabilities.
- Qt Versit - Support for vCard and iCalendar formats
- Qt Wayland - Linux only. Includes Qt Compositor API (server), and Wayland platform plugin (clients)
- Qt Feedback - Tactile and audio feedback to user actions.
- Qt JSON DB - A no-SQL object store for Qt.
Note
As these modules are not part of the release the state differ between modules, depending how many contributors are active and how well it’s get tested.
1.3.2. Supported Platforms
Qt supports a variety of platforms. All major desktop and embedded platforms are supported. Through the Qt Application Abstraction, nowadays it’s easier to port Qt over to your own platform if required.
Testing Qt 5 on a platform is time consuming. A sub-set of platforms was selected by the qt-project to build the reference platforms set. These platforms are thoroughly tested through the system testing to ensure the best quality. Mind you though: no code is error free.
1.4. Qt Project
From the qt-project wiki:
“The Qt Project is a meritocratic consensus-based community interested in Qt. Anyone who shares that interest can join the community, participate in its decision making processes, and contribute to Qt’s development.”
The Qt-Project is an organisation which developes the open-source part of the Qt further. It forms the base for other users to contribute. The biggest contributor is DIGIA, which holds also the comercial rights to Qt.
Qt has an open-source aspect and a comercial aspect for companies. The comercial aspect is for companies which can not or will not comply with the open-source licenses. Without the comercial aspect these companies would not be able to use Qt and it would not allow DIGIA to contribute so much code to the Qt-Project.
There are many companies world-wide, which make their living out of consultancy and product development using Qt on the various platforms. There are many open-source projects and open-source developers, which rely on Qt as their major development library. It feels good to be part of this vibrant community and to work with this awesome tools and libraries. Does it make you a better person? Maybe:-)
Contribute here: http://wiki.qt-project.org